

Tuesday, December 2, 2014
Tweet Tweet Danger*
Monday, November 24, 2014
A Tale of Two Vests
These past two weeks I have been busy with visitors, my daughter's musical and home remodeling projects that are finally getting underway, so I have been slow to post about my two new vest designs. Both are in books from Sixth & Spring, the book division of Vogue Knitting. But, the two vest, while wildly different, both reflects aspects of my design passions.
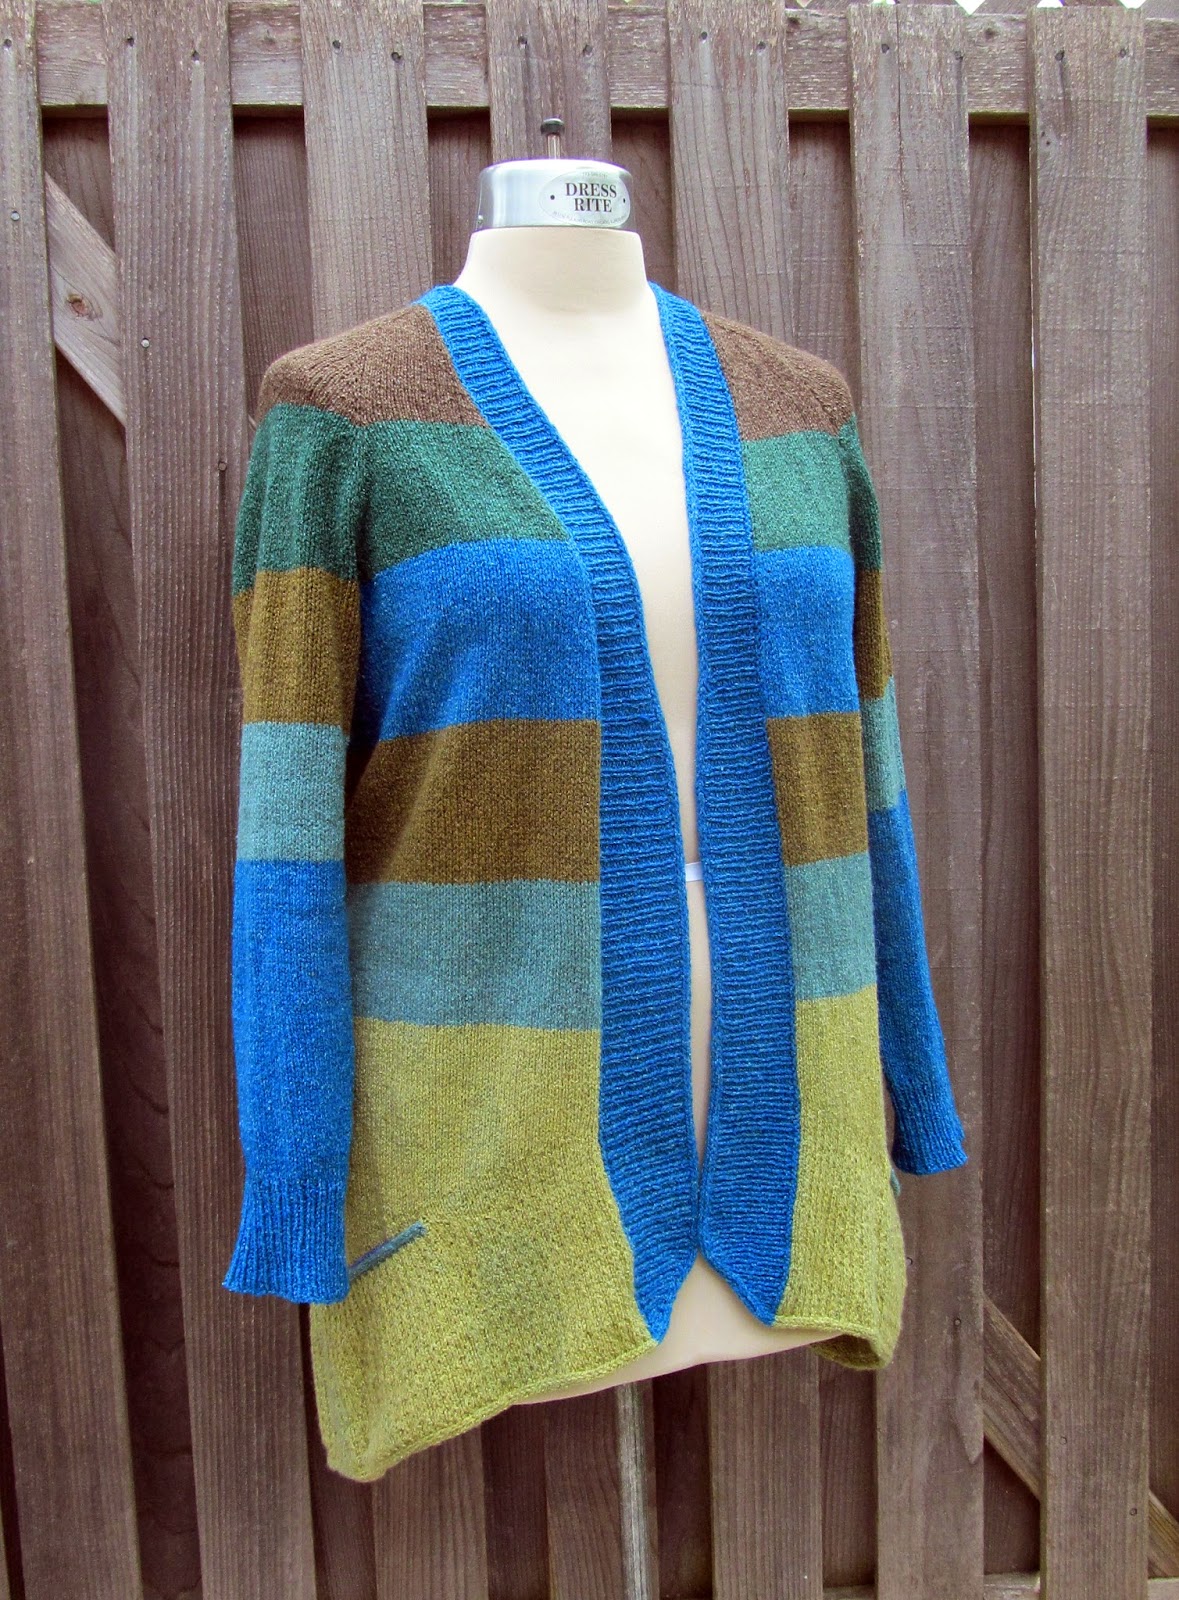
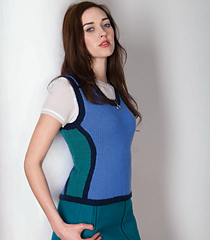 The first is Sky Beauty from Vest Bets: 30 Designs to Knit for Now Featuring 220 Superwash® Aran from Cascade Yarns. In my mind, this was 'the hourglass vest', as it's intention is to allow the colorblocking and strong outlines create an hourglass figure. In that sense, I think it is quite a successful design. I also enjoy how sporty it seems because of the dark outlines, and the combination of sporty and feminine is not easily achieved.


 In designing Sky Beauty, the color combination was the most significant factor. To make the sides visually fade away thus slimming the figure, they need to be darker than the center. But, should the outlines be darker still? I created a couple different options in my proposal. The first option is the direction the editors chose to go, only substituting navy for the royal blue in the outline. The two second options both place the darkest color at the side, and then use a mid-tone color for the outline. They are more slimming, but lack the sporty flair of the first option. This is why it's a great idea to sketch a color combination before committing to the knitting.
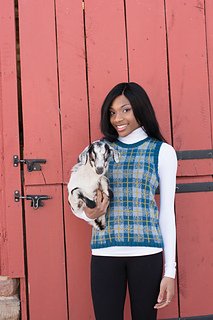 My second vest design, the County Line Vest, is from Modern Country Knits: 30 Designs from Juniper Moon Farm by Susan Gibbs. Surprise! It's plaid. But, I think this may be the nicest of my plaid designs. This design uses the two-stranded intarsia and applied crochet techniques combined. The two strands of Findley worked up like a dream. The fabric is nearly weightless, but with a luminescence. It really is just gorgeous, and the photos don't do it justice.
 Color was again important here, so the editors had me work up several swatches of color combinations. I have not yet received my designer copy of the book, so I can't say whether they made the final cut. Maybe'll I will dedicate another post to discussion of those options when it arrives.
And don't you love the kid in the photograph? I have always had a weakness for goats, but can't imagine how they got this babe to kiss the model.
The first is Sky Beauty from Vest Bets: 30 Designs to Knit for Now Featuring 220 Superwash® Aran from Cascade Yarns. In my mind, this was 'the hourglass vest', as it's intention is to allow the colorblocking and strong outlines create an hourglass figure. In that sense, I think it is quite a successful design. I also enjoy how sporty it seems because of the dark outlines, and the combination of sporty and feminine is not easily achieved. My second vest design, the County Line Vest, is from Modern Country Knits: 30 Designs from Juniper Moon Farm by Susan Gibbs. Surprise! It's plaid. But, I think this may be the nicest of my plaid designs. This design uses the two-stranded intarsia and applied crochet techniques combined. The two strands of Findley worked up like a dream. The fabric is nearly weightless, but with a luminescence. It really is just gorgeous, and the photos don't do it justice. Color was again important here, so the editors had me work up several swatches of color combinations. I have not yet received my designer copy of the book, so I can't say whether they made the final cut. Maybe'll I will dedicate another post to discussion of those options when it arrives. And don't you love the kid in the photograph? I have always had a weakness for goats, but can't imagine how they got this babe to kiss the model.
Friday, November 21, 2014
Stylin' Falkirk


 I love the way they paired bright colors from the plaid with the cardi because it reads as a neutral from a distance. I also love the 'sexy secretary' shoes they matched with the first two outfits. And, it's easy to miss, but I especially love the touch of leopard under the cardi in the red pants outfit. So, how would you wear Falkirk?
 Wednesday, October 29, 2014
Chilly Styling
 OK, so you know that I am always harping on about how vertical lines are slimming, making cardigans a better option than pullovers, yada, yada, yada. Well, as I was scanning the fall Talbots catalog for last week's post, I noticed something interesting. Almost every photograph of a coat or jacket showed it hanging open. And once I noted this, I had to quantify it. Of the fourteen outerwear garments, eleven were shown unbuttoned, unzipped, untoggled, etc. Of the three coats that the models wore fully closed, all three were double-breasted, a style that looks very awkward hanging open because of the extra width of stiff fabric.
  Now, I am pragmatic enough to say that the slimmer look gained by the models wearing opened coats is perhaps not the only reason Talbots might be styling them this way. They are in the business of selling clothing, and the more you can show of a garment, the more of it you will sell. But they certainly are not choosing to not sell double-breasted coats because they don't reveal the sweater underneath. The fact that every coat that can be worn open is means that there must be another advantage, and a coat that makes an already slim model look every taller and slimmer must stir a few more shoppers to purchase.
So does this mean we need to freeze all winter to have the slimming look of an open coat? Not possible if you live in Wisconsin, as I now do. My personal solution is to wear a long scarf. Let the tails hang down the tightly buttoned front of your coat and you not only get a slimmer look, you have an extra layer of warmth.
Wednesday, October 22, 2014
The Real Halloween Fright: Cabled Knits
 |
| Drop shoulder Aran Sweater from J Jill |
The shape of traditional Aran sweaters, usually boxy with dropped shoulders, in combination with the stiffness of the fabric, results in all loss of the body underneath, and the torso is large and boxy with an excess of fabric under the arms. Not a slimming or flattering look.
 |
| Talbots sweater |
How do you make an Aran sweater wearable for a fuller figure? Remove all stiffness from the fabric. Choose a yarn with drape and work in on larger needles to open up the fabric. You also want to move away from the traditional shape: drop shoulder, crew neck, no side shaping and oversize. Make it a cardigan (also pretty traditional) and you've introduced a flattering horizontal line. Bring the fit close to the body, and add some shaping through the torso. Convert the drop shoulder to a fitted sleeve and eliminate the bulk under the arm. And, if you are willing to stray a little from the traditional, add a v-neck, which is a universal flatterer.
 |
| Grandpa Cardigan by Joji Locatelli |
 |
| Grandpa Cardigan knit by Vaida |
Tuesday, September 23, 2014
Greetings From Wisconsin: Downton Abbey Knits 2014
 It's been a while . . .
 I moved to Wisconsin the last week of August, spent a week getting the kids registered and ready for school and unpacking the minimum, and then have spent the past three weeks working loooong days on a hush hush project. My deadline was generous, but I was so anxious before the move that I
But I do have something fun to share - my contribution to the 2014 edition of The Unofficial Downton Abbey Knits. Now that the show is into the flapper era, I could not resist. My design is a modular lace blouse worked in Artyarn's Empress. There are three different patterns at play, and one has variations for flat and in-the-round knitting. I also threw in a little crochet - single and reverse single - to trim the edges.
One of the great joys in designing for publications is the time lag. (And, I must say, one of the drawbacks. Who wants to have to keep mum for that long?) It's always a surprise to see your almost-forgotten project again, and beautifully photographed on a lovely model. I have to remind myself that I made it!
 The fun in this design is that it is worked in panels, with the center front and back worked bottom-up, then the front and back side/strap pieces worked sideways off them. The panels under the arms are continuations of the front sideways lace pieces which are joined with a 3-needle bind off to the back lace panels. Then the bottom band is picked up and worked top-down. The only sewing is to attach the decorative buttons. Modular lace is not for the beginner, but this would be an adventure for a knitter with a little lace experience.
There are many gorgeous designs in this issue from great designers - Annie Modesitt, Martin Storey, Vicki Square - and some lesser known designers who have hit it out of the park, like Gini Woodward. Grab a copy when you see it - the 2013 issue sold out the day it arrived at my LYS!
Tuesday, August 5, 2014
Plaid is Busting Out All Over
In the past week, two of my plaid designs have been released - a shawl-collar cardi for Twist Collective and a men's vest for Chicago Knits. Both of these are new publications for me, and I am excited to be part of both.
The Twist sweater is one of my more accessible plaid designs. No intarsia here, just some knitted in horizontal stripes and applied crochet chain vertical stripes. I simplified it even more my keeping the raglan sleeves plain. Working the edging in one of the plaid colors ties it all together.
The style, a shawl-collar, raglan cardigan is a universally flattering design. The extra weight of the collar is especially nice for narrow-shouldered bodies. The belt is knit, but you could easily substitute a purchased belt, or leave it off altogether if your waist is not a feature you choose to highlight.
The Chicago Knits design is for their men's issue. I used the same technique as the Twist sweater (applied crochet chain), but we made it a little funky by fading out the plaid at the lower front edge. You can either follow the chart to replicate my exact fade, or experiment with your own. The traditionalists could also work the vest in full plaid. My handsome husband was recruited as model here, although in real life he rarely wears sweaters. (His metabolism runs fast, while mine would lose in a race with a slug.)
I've got one more plaid design awaiting release, and it's really gorgeous. Can't wait to share it with you.
 |
| Twist Collective Fall 2014 |
The Twist sweater is one of my more accessible plaid designs. No intarsia here, just some knitted in horizontal stripes and applied crochet chain vertical stripes. I simplified it even more my keeping the raglan sleeves plain. Working the edging in one of the plaid colors ties it all together.
The style, a shawl-collar, raglan cardigan is a universally flattering design. The extra weight of the collar is especially nice for narrow-shouldered bodies. The belt is knit, but you could easily substitute a purchased belt, or leave it off altogether if your waist is not a feature you choose to highlight.
 |
| Chicago Knits Summer 2014 |
The Chicago Knits design is for their men's issue. I used the same technique as the Twist sweater (applied crochet chain), but we made it a little funky by fading out the plaid at the lower front edge. You can either follow the chart to replicate my exact fade, or experiment with your own. The traditionalists could also work the vest in full plaid. My handsome husband was recruited as model here, although in real life he rarely wears sweaters. (His metabolism runs fast, while mine would lose in a race with a slug.)
I've got one more plaid design awaiting release, and it's really gorgeous. Can't wait to share it with you.
Wednesday, July 30, 2014
My Studio: Temporarily Imperfect Reality
So, you may have noticed blogging has been a bit light of late. That's because I've had some big news that I was asked not to share publicly, but the cat is now out of the proverbial bag - my family is moving to Wisconsin! It's been crazy as my husband has started his new job in Menominee Falls (Milwaukee suburbs), we've put our Chicagoland home on the market and house hunted around Milwaukee. We'd like to land in the Hartland/Delafield area, but have to wait for our house to sell to buy there. And all before the start of school . . . .
So, before it becomes a pile of boxes, and then only a memory, I thought I would share my studio space. My husband would freely tell you that in reality our entire house is my studio, but this is the room that is exclusively mine. In all truth, this isn't truth. My space never looks like this except for the unreal staging required of selling a house. So add piles on tops of bookcases, bins on the floor and an overflowing closet. That's reality.
These photos are also in the aftermath of a major purge. One of my LYS, String Theory, has a stash sale in late July, and I took advantage. About a quarter of my books and nearly half my yarn stash went on the block. I took all my single balls, leftovers, bits and bobs and made fun assortments by color. I also unloaded my angora since my allergies seem only to be getting worse, and my last attempt to knit with it left me with a day of scratching. The sale was last weekend, so I will call over
to String Theory tomorrow to see how I did. Can't wait to see how much I have to spend in store credit - just in time for the Chicago Yarn Crawl!
Back to the studio - although the thought of a three digit yarn store credit is sooo dreamy.
There's very little actual yarn in this room - only pending projects and my stash of recycled cashmere. The yarn stash resides in plastic bins in the basement. The purge reduced their number from ten to five. Smiles from hubby.
With less yarn in the studio, there's no way to hide my multi-craftual nature. The sewing machine and serger are in plain sight. Crochet books are in the open. Needlepoint is on the table, and the jewelry making supplies are in the wall unit. You can also see my constant companions, Gert and Trudy. Trudy is the younger me, and Gert the present me.
Here's a shot of my recently reorganized needle collection. I picked up the stoneware storage pieces at a garage sale and moved them in after a good scrub. You can't see that the short round container holds my 16" circular needles.
And, last but not least, my inspiration board. It is composed of four smaller bulletin boards hung together. It changes frequently as older items come off to make room for the new.
In our new house the idea is for me to have a slightly larger studio space to contain more of the multi-crafting activities. Stay tuned to see how that works out.
 |
| View from the door |
 |
| Computer station |
to String Theory tomorrow to see how I did. Can't wait to see how much I have to spend in store credit - just in time for the Chicago Yarn Crawl!
 |
| Reference books - to the right of computer station |
Back to the studio - although the thought of a three digit yarn store credit is sooo dreamy.
 |
| Pattern books and crochet books |
 |
| Wall o' storage |
With less yarn in the studio, there's no way to hide my multi-craftual nature. The sewing machine and serger are in plain sight. Crochet books are in the open. Needlepoint is on the table, and the jewelry making supplies are in the wall unit. You can also see my constant companions, Gert and Trudy. Trudy is the younger me, and Gert the present me.
 |
| Needle storage |
Here's a shot of my recently reorganized needle collection. I picked up the stoneware storage pieces at a garage sale and moved them in after a good scrub. You can't see that the short round container holds my 16" circular needles.
And, last but not least, my inspiration board. It is composed of four smaller bulletin boards hung together. It changes frequently as older items come off to make room for the new.
 |
| Inspiration board |
In our new house the idea is for me to have a slightly larger studio space to contain more of the multi-crafting activities. Stay tuned to see how that works out.
Saturday, July 19, 2014
A Definition
"An expert is a person who has made all the mistakes
that can be made in a very narrow field."
Niels Bohr, Scientist
"Call me a knitting expert."
Theresa Schabes, Woolly-Wits
that can be made in a very narrow field."
Niels Bohr, Scientist
"Call me a knitting expert."
Theresa Schabes, Woolly-Wits
Thursday, June 26, 2014
Which Sweater is Best for Our Svelte New Friend?
The new Webs summer catalog has just been issued, so it's time for one of my favorite games: Which Sweater is Most Flattering? This time around, there's a new model. Unfortunately, she is more modelesque than the typical Webs model, and shaped less like the average woman. (Who, by the way, is a size 14 if she is living in the US.) But, the game continues. I've pulled our svelte new model's photos in the more summery garments, since I can't look at long-sleeved worsted wool sweaters in June.
 |
| Laurentide Sweater designed by Sara Delaney |
Laurentide is in Berkshire yarn which has a knitting gauge of 16 sts over 4"/10 mm. The Bilateral is in BFL Worsted Hand-Dyed by the Kangaroo Dyer. The Colorfall Cardigan is in Charlemont which is advertised at a sock weight of 28 to 32 sts over 4"/ 10 mm, but the sweater gauge is 20 sts, so worked loosely for drape.
 |
| Colorfall Cardigan designed by Kirsten Hipsky |
So, it's down to Laurentide and Colorfall. Again, if you've played the game before, you know that a cardigan almost always wins. The introduction of that vertical design line at the center of the body is very slimming. Laurentide is giving it a run, however, with it's open neckline and slimming diagonal patterning. But, it loses me with the cap sleeves. Besides, the lovely drape of Colorfall was always going to win in the end.
 |
| Bilateral Cardigan designed by Kirsten Hipsky |
Colorfall's design would work on many body types, especially if color is used to draw focus. For bottom-heavy bodies, use a lighter/brighter color on top and a darker/deeper color on the bottom. For top-heavy figures, do just the opposite. Lighter/brighter will always attract the eye, so put it where you want observers to look. Let the other parts fade into the background.

The Laurentide sweater also gives me an opportunity to rant about a style of sweater that irks me - the 'coffin sweater'. These are the garments which are patterned on the front - sometimes quite elaborately - but completely plain on the back. As though the sweater were only to ever be viewed from the front. As if worn when taking a very long rest. This is especially irksome when adding a little pattern to the back doesn't seem to require much effort, such as with Laurentide. Since the front and back appear to be identical, why not add a little pattern? Think how much it would brighten the day of the person in line behind you at the DMV.
Monday, June 2, 2014
Top-Down Knitting: The Disadvantages for Big Girls
Last week I rambled on over my glee with my newly-finished BlueSand cardigan. And, I do love it. But . . . it has not changed my preference for bottom-up knitting, especially for us non-waif-like ladies.
From surfing Ravelry, one could conclude that knitters overwhelmingly prefer top-down sweater construction. And, there are some good reasons for them to do so:
1. Top-down sweaters allow you to try on for fit as you go.
2. Top-down sweaters allow you to adjust for fit, as well as arm and body lengths, while knitting is in progress.
3. Top-down sweaters generally have very few seams.
4. Top-down sweaters generally have less finishing. This is because of the lack of seams and resulting yarn ends to weave in.
Good reasons, all, especially if one knows any knitters who would bury a nearly-finished sweater at the bottom of their UFO pile for years rather than take the 45 minutes required to sew a few seams and weave in ends. (No judgment - we all have our quirks!)
But, here's the thing: the bigger you are, the less these really are advantages. Take #1. Yes, you can try on as you go. However, there is really no point to trying on your sweater-in-progress until you are closing in on the armpit. But by then you have already done a whole lotta knitting. And, if things (like gauge) have gone really off the rails, that's a whole lotta knitting to rip. (An aside here to say that every single top-down sweater I have knit has had to be ripped back to the beginning after reaching the armpit. Including BlueSand. Even after completing a generously sized swatch.) On a bottom-up sweater, I can start with a small piece, like a sleeve, work for several inches and then re-check gauge. Assuming the math is good, I can knit on with confidence. Much less of an investment of ripping has to happen.
Another disadvantage alluded to above is the length of the rows. Those last couple inches before the arms are split from the body are loooong rows. Not so bad for a knit row, but it takes steely reserve to launch into that much purling.
Yet another disadvantage is that you are working the entire sweater in one piece. If you save the arms for last, as most patterns do, that's a big mess of sweater twisting in your lap as you knit your sleeves in the round. Smarter knitters do the sleeves before the body, but then it's hard to double-check their length without the weight of the sweater body holding them in place.
Here's the thing about these last two points. The bigger you are, the longer the rows will be, and the more your sweater will weigh. So, as your sweater increases in size, all the disadvantages of top-down knitting are exaggerated. But, there's the biggest disadvantage of all . . .
No seams. Why is this a disadvantage? Seam give your garment structure and strength to carry its weight. Thanks to gravity, the weight of your sweater - both body and arms - is carried by your shoulders. In a bottom-up sweater, there are typically some nicely reinforced shoulder seams. (I give mine extra strength by constructing with a 3-needle bind off.) If you don't have seams, what is carrying all that weight? Your stitches. And, the bigger the sweater, the greater the weight and the greater the stress on those shoulder stitches. At the least the stitches will become distorted and throw off your carefully fitted and adjusted bodice, as well as the length. At worst the yarn will not be able to bear the tension and will break.
So, I know knitters don't love sewing seams, because if we did we'd be quilters. But, it's a trade-off that I am usually pretty happy to make because I know that it results in a more stable, stronger sweater. And the proportion of time spent sewing as compared to the time spent knitting is really a tiny fraction.
Have I convinced you?
 |
| BlueSand by La Maison Rililie |
1. Top-down sweaters allow you to try on for fit as you go.
2. Top-down sweaters allow you to adjust for fit, as well as arm and body lengths, while knitting is in progress.
3. Top-down sweaters generally have very few seams.
4. Top-down sweaters generally have less finishing. This is because of the lack of seams and resulting yarn ends to weave in.
Good reasons, all, especially if one knows any knitters who would bury a nearly-finished sweater at the bottom of their UFO pile for years rather than take the 45 minutes required to sew a few seams and weave in ends. (No judgment - we all have our quirks!)
But, here's the thing: the bigger you are, the less these really are advantages. Take #1. Yes, you can try on as you go. However, there is really no point to trying on your sweater-in-progress until you are closing in on the armpit. But by then you have already done a whole lotta knitting. And, if things (like gauge) have gone really off the rails, that's a whole lotta knitting to rip. (An aside here to say that every single top-down sweater I have knit has had to be ripped back to the beginning after reaching the armpit. Including BlueSand. Even after completing a generously sized swatch.) On a bottom-up sweater, I can start with a small piece, like a sleeve, work for several inches and then re-check gauge. Assuming the math is good, I can knit on with confidence. Much less of an investment of ripping has to happen.
Another disadvantage alluded to above is the length of the rows. Those last couple inches before the arms are split from the body are loooong rows. Not so bad for a knit row, but it takes steely reserve to launch into that much purling.
Yet another disadvantage is that you are working the entire sweater in one piece. If you save the arms for last, as most patterns do, that's a big mess of sweater twisting in your lap as you knit your sleeves in the round. Smarter knitters do the sleeves before the body, but then it's hard to double-check their length without the weight of the sweater body holding them in place.
Here's the thing about these last two points. The bigger you are, the longer the rows will be, and the more your sweater will weigh. So, as your sweater increases in size, all the disadvantages of top-down knitting are exaggerated. But, there's the biggest disadvantage of all . . .
No seams. Why is this a disadvantage? Seam give your garment structure and strength to carry its weight. Thanks to gravity, the weight of your sweater - both body and arms - is carried by your shoulders. In a bottom-up sweater, there are typically some nicely reinforced shoulder seams. (I give mine extra strength by constructing with a 3-needle bind off.) If you don't have seams, what is carrying all that weight? Your stitches. And, the bigger the sweater, the greater the weight and the greater the stress on those shoulder stitches. At the least the stitches will become distorted and throw off your carefully fitted and adjusted bodice, as well as the length. At worst the yarn will not be able to bear the tension and will break.
So, I know knitters don't love sewing seams, because if we did we'd be quilters. But, it's a trade-off that I am usually pretty happy to make because I know that it results in a more stable, stronger sweater. And the proportion of time spent sewing as compared to the time spent knitting is really a tiny fraction.
Have I convinced you?
Tuesday, May 27, 2014
My BlueSand
The table is set. The wine is poured. Crow is served.
Yes, I confess to breaking my own rules. Sometimes the temptation is just too much. So what design flirted so hard with me that I succumbed to its horizontal stripes? BlueSand from La Maison Rililie.
I loved the easy shape. I loved the big, bold front bands. But, most of all, I loved the pockets. I was a goner.
 When I was asked to step in as leader of an existing knit-along at the shop where I teach, I knew our first project had to be a design with near-universal appeal. But, also one that would be flattering on a variety of figure types. BlueSand fit the bill. The stripe pattern also allows for much individual creativity, which always makes a project more fun.
 So, how did I play with those terrible horizontal stripes to play them down? I turned them on ear to create a ombre effect. Since my body has wide shoulders and a broad chest, and relatively narrower hips, I placed the darkest colors on top and worked my way down to the lightest. (BlueSand is knit top-down.) For most of you who are more pear-shaped, you would reverse the direction with the lightest colors closest to your face. I also chose a brighter, but mid-range, color to create the front bands and make a strong vertical line to lengthen the body.
How do I feel about the results? I love it!
Thursday, May 22, 2014
Even More Summer Cardigans
So, we've been checking out ideas for summer cardigans - little sweaters to throw over a tank top/camisole or summer dress to dress it up a little, add a little warmth in an overly-air conditioned room, or, most importantly to me, cover those upper arms to which genetics or gravity has not been kind. As I was coasting through Ravelry, as I am want to do from time to time (if defined as several dozen occasions per day), I happened across a great new pattern - Myrna by Andi Satterlund.
 |
| Myrna by Andi Satterlund |
Myrna has a vintage vibe with it's close curve-enhancing, waist-hugging fit. And the sassy pin-up girl styling certainly enhances that look. Love, love, love the deep V-neck. It is extra-sassy here with the exposed cleavage, but would be equally charming, and definitely more modest worn over a garment with a higher neckline. The sleeves are a perfect length with full coverage, but stopping just short of the elbow. Since it appears to have zero to negative ease, wearing Myrna open would cause it to hand nicely to the side.
 |
| Miette by Andi Satterlund |
So, Myrna or Miette, either lady would be another great summer cardi choice.
Tuesday, May 20, 2014
Crochet Chain Applique Tutorial
 |
| Vogue Knitting's The Ultimate Hat Book |
A quick review of my designs makes it clear that I have a passion for plaid. I am not sure why since I don't bear a Scottish heritage. And, the private school uniform typically causes a life-long aversion to plaid. So, I suppose it is due to my love of color, but the opportunity to use it in a controlled manner. My interest may also be that I've learned a few tricks to simplify plaid patterning, and I am willing to share my favorite with you.
The key characteristic of plaid is the crossing horizontal and vertical stripes. In knit fabric, horizontal stripes are a beginner-level pattern - just change colors for one or more rows. Vertical stripes are a whole different challenge. Traditionally that problem was resolved by working intarsia. In my mind that might be fine for a wide stripe, but narrow it down to just a few stitches - or even one stitch - and it becomes a disruptive step that often results in uneven stitches.
 |
| Knitted base fabric, crochet hook and accent yarn |
A better approach is to work the verticals after the knitting is complete with an applied crochet chain stitch. This creates strong, clear vertical lines one stitch wide. And it is much faster to work a crochet chain stripe than to knit it into the fabric in intarsia.
You'll need a crochet hook matched to the size of your knitting needle. Translate each to a mm measurement to find your size, find a reference chart on the internet, or pull out your needle gauge (most have the conversion since they can also be used to size crochet hooks).
 |
| Insert hook thru fabric at base of purl channel |
It is easiest to work an appliqued crochet chain into a column of purl stitches for a couple reasons. First, it is much clearer where to work, and your stitches won't wander across columns. But also, the depression caused by the purl channel allows the ridge of crochet chain to sit nearly flush with the surface of the stockinette fabric. You can certainly work a crochet chain on a plain stockinette base, but your chain will sit above the fabric.
Ready to give it a try?
 |
| Putting slip knot on hook on wrong side |
 |
| Slip knot pulled thru to right side |
Begin with the right side facing,
and starting at the cast on edge, insert crochet hook through the
fabric at the base of the column of ladders of the purl stitch groove. With your other hand and working yarn on wrong side, place
the slip knot on hook and pull through to right side.
 |
| Inserting hook for first chain stitch |
 |
| Continuing on with chain |
*Advance hook over next yarn ladder up in vertical column and insert through
fabric. Wrap yarn around hook and pull
new loop through to right side of fabric and through loop on crochet hook. Repeat from * until you reach the last ladder before the top of the
groove at the bound off edge.
 |
| Making progress |
Be careful
not to work tightly, as that will draw in fabric and shorten the piece. Every couple inches stop and give your work a tug along the vertical axis to check that it is not too tight and that the fabric remains elastic.
To finish your chain, remove the last loop from hook and, inserting hook
from WS at top of purl column, pull loop to WS.
Cut yarn and pull through. Repeat
for all vertical purl stitch grooves.
If you are working several closely spaced chains, the yarn ends from your completed chains may tangle with your working yarn. If this happens, stop and weave in your ends.
 |
| Gait's Haire Cowl |
Speaking of weaving in ends, there will be quite a few. To weave them in most invisibly, work the end back into the backside of the crochet chain. The chain is much tighter than the surrounding knit fabric and will hold it secure. This method also works well to hide the ends when your knit fabric is sheer, as in my Gait's Haire cowl or wrap design.
 |
| Picture Perfect Plaid from 60 Quick Baby Blankets |
If you'd like to give this technique a try on a smaller project, I suggest my Cuthaig Plaid Mitts. Another smaller project is the plaid tam pictured at the top of the post. On a larger scale is my plaid baby blanket.
 |
| Cuthaig Plaid Mitts |
I also have a couple new plaid garment designs using the applied crochet chain appearing in publications later this year, so keep an eye out.
Subscribe to:
Posts (Atom)