I am here today to speak of my affection for stitch markers. This urge came upon me at the Sun Valley Fibers retreat this weekend when Amy of the Stockinette Zombies asked me why I had over a dozen stitch markers in a column down the edge of my knitting. Not only was she correct to ask for the reason behind this goofy behavior, but I also realized that I was using four colors of stitch markers for four different applications. And, only one of them was called for in the pattern.
First, I thought I'd share with you my favorite type of stitch marker. Yep. The cheapo plastic locking stitch markers. Many knitters enjoy assembling a collection of gorgeous stitch markers. Some are so beautiful that the knitters actually wear them as jewelry. But not many of these beauties meet my criteria for versatile stitch markers: colorful and locking. Color coding my stitch markers by their function makes them easier to use and prompt an all-too-busy brain.
The hot pink stitch marker in the photo above is the only one actually called for in the pattern. (And the pattern is my Ardyth by Coco Knits. Its function is to denote the break between the front and the back, since it is knitted all in one piece. The orange markers are my own addition and mark each increase. They are not written into the pattern, because the directions call for you to increase until you reach a certain stitch count. But, for me, the markers are a clear visual and tactile reminder that I need to increase. And this is important when one might be distracted by table chatter at a retreat or guild meeting, or a particularly dramatic moment of Downton Abbey. It's also faster to count markers to know how many times you have increased than it is to count the stitches on the needle.
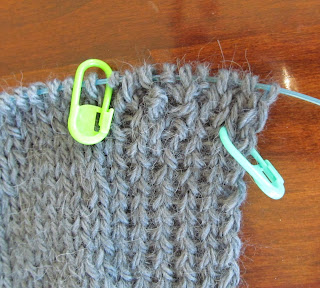
This photo demonstrates the purpose of the other two colors of stitch markers on my work. The lime green marker is indicating the break between the stockinette fabric and the ribbed edging. Without it I would purl all the way to the edge on virtually every wrong side row. The last marker in play, the blue one hanging off the edge, is marking my buttonhole. Again, it is a visual reminder that I need to be making holes in my knitting every few inches.
Other uses for my little buddies:
- Cast on counting. When casting on a lot of stitches, I will add a stitch marker to my needle every fifty stitches. Then I don't have to re-count from the beginning when I want to check that I have enough stitches. And it is so easy to lose track when your count is up into the hundreds.
- Marking the right side of your knitting. This is a useful tip for beginners or reversible projects. After casting on, I will place a stitch marker on the lower right corner of my right side. Then a quick glance tells me if I am working the right or wrong side of my knitting. When working a long piece, such as a scarf, I will move the marker up as I go so it is always in my visual field.
- Marking the location of a centered decrease. When working a column of double decrease, such as k3tog or p3tog or their many variations, if your marker is on the needle immediately before the decrease stitch of the last row, it has to be taken off the needle and replaced with every decrease. If, instead, you place it on the stitch, and move it up every few rows, you can follow the column with your eyes to know where to center the decrease (or increase).
So, basically what this comes to is the recognition that my brain needs prompting, and that I would rather take the time to add extra stitch markers to my needles or my work than to have to rip back when I have forgotten to work an increase/decrease, change pattern, make a buttonhole, etc. It's a trade off, but these days I'd rather have well known podcasters ask me the reasons for my goofy behavior than have to tear out minutes or hours of knitting.


No comments:
Post a Comment