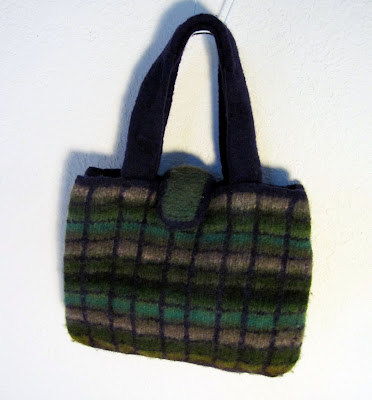
Plaid + Felt = Bag
MATERIALS
Noro
Kureyon (MC), 100m/50g, (color #236 shown), or other worsted weight, feltable, self-striping yarn, two balls
Cascade
220 (CC), 100gr/ 220yds, (color #2410
shown), or other worsted weight, solid-colored, feltable yarn, one ball
24”
circular needle, U.S. size 10/6 mm
Crochet
hook, size J/6 mm
4
stitch markers (3 the same, one different), tapestry needle, magnetic bag closure
SIZES (approximate)
 |
| Alternate color way |
Pre-felting
bag:
12” across by 3¼” deep by 10½” high
strap: 2” wide by 24” long
closure
w/ I-cord: 2 ¾” wide by 6½” long
Post-felting
bag: 11” across by 3” deep by 8” high
strap: 1½” wide by 18” long
closure
w/ I-cord: 2¼” wide by 5½” long
GAUGE
Approximately
16 sts and x 24 rows over 10 cm/4 in
DIRECTIONS
Bag Bottom
With
CC, cast on 50 sts. Work in garter
stitch (knit every row) for 16 ridges or 32 rows. Pick up
sts around garter bottom: Change to
MC. Knit one row, placing a marker
before last stitch. Continuing on to
adjacent short side, pick up and knit 15 sts.
Place marker and then turn and pick up and knit 50 sts along long side,
placing a marker before picking up last st.
Pick up and knit 15 sts along remaining short side – 130 sts total. Place the different marker at end of row to
indicate the beginning of the round.
Bag Body
With
MC, join to work in the round and begin pattern stitch:
Rounds
1 – 5: With MC, * p1, k4, p1, k5; rep from * to 5 sts before next marker ending
with p1, k4. Repeat 3 more times, one for each side of bag. (The short sides will only have one repeat of
pattern.)
Round
6: As in Rows 1 – 5, only using CC.
Repeat
Rounds 1 – 6 until 9 full repeats have been worked, and then work one more
repeat ending with Row 5. Change to CC
and knit one row, keeping only the 1 st after markers in purl. Continuing to keep the 1 st after the markers
in purl, purl one row
and then knit one row. Bind off all sts in purl. Weave in ends.
 |
Applied Crochet
Chain (see sidebar for link to a photo tutorial of this technique)
Note: the applied crochet chain stitch is worked
into all the columns of purl sts, except for the four corners of the bag. With CC, make a slipknot, leaving about a
5” tail. Work crochet chain stitch as
follows: with RS facing, insert crochet hook through the fabric of the bag into
the center of a purl column just above bag bottom. With other hand and working yarn inside bag,
place the slip knot on hook and pull through to RS. *Advance hook over next purl bump in vertical
column and insert through bag. Wrap yarn
around hook and pull through to RS. Pull
new loop through old loop on hook.
Repeat from * until top of bag is reached. Then break yarn and pull through remaining
loop.
Note: As you work, the yarn ends from previously
completed crochet chains may tangle in your working yarn. If this happens, you should stop and weave in
all ends before continuing.
Bag Handles (make 2)
With
CC, cast on 11 sts. *K8, bring yarn
forward between the two needles, slip the last 3 sts; repeat from * until piece
measures 24”. Bind off.
Bag Flap with
I-cord Edging
(make 1)
With
MC, cast on 8 sts. Knit every row until
piece measures 6”. With CC, cast on 3
sts. *K2, ssk, slip 3 sts back to left
hand needle; repeat from * to last st. Work corner: K3, slip 3 sts back to left
needle, k2, ssk, slip 3 sts back to left needle, k3. Turn piece and with MC pick up 1 st for every
ridge along side. Slip picked up sts
back to left needle and continue with I-cord edging, including turning
corner. Turn and with MC pick up 8 sts
along short end. Slip picked up sts back
to left needle and continue with I-cord edging, including turning corner. Turn and pick up 1 st for every ridge along
last side and then continue with I-cord edging.
When you reach cast on edge of I-cord, graft the last sts to the cast on
sts. Closure
backing: With CC, cast on 8
sts. Work in st st for 2”. Bind off.
Weave in all ends.
FELTING
Note: all pieces (bag, handles, flap) are felted
separately and then sew together after drying.
The
felting process interlocks the wool fibers so that the fabric is thicker and
less elastic. Put the pieces in a
lingerie bag or pillow case and close it (use safety pins on pillowcase). Place the bag in the washing machine with a
load of washable, lint-free, heavy-weight items to increase agitation. Well-laundered jeans are ideal. Try
adding a pair of sneakers or tennis balls to the felting load to increase the
agitation. Since the plaid bag has color contrast, you
may want to add a dye magnet sheet to prevent bleeding. Set the machine for hottest water, cold
rinse. (The shock of the difference in
water temperatures also promotes felting.)
Use a little bit of your normal detergent, but no bleach or fabric softener. Check your bag frequently for signs of
shrinkage, and then more frequently as it begins to felt. Your bag is finished felting when it has
reached the final dimensions, or you are happy with its size and
appearance.
Your
bag’s shape may distort in the felting process. Pull it back into shape and stuff with
plastic bags or set it over a square object of the right size to set while
drying. Shape flap by folding in
half. Allow all pieces to dry completely.
FINISHING
Sew
handles to inside of bag. Attach one
side of magnetic closure to backing piece and sew the piece to one end of reverse
side of flap. Sew the other end of flap
to bag. Position other half of closure
on bag and attach.


