About Woolly Wits

I am a hand-knitting designer and teacher. See and purchase my published designs on Ravelry.

Friday, February 19, 2016

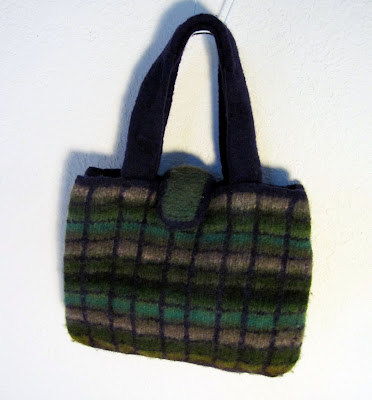
Freebie Pattern: Plaid + Felt = Bag

Since I've been all 'bout the plaid, I've decided to share this pattern for a simple plaid-effect felted bag which was a class I taught at Knitche in Downers Grove, Illinois.  The bag uses self-striping yarn to create horizontal stripes and the surface crochet technique to create the vertical stripes.  Enjoy!

Plaid + Felt = Bag

MATERIALS
Noro Kureyon (MC), 100m/50g, (color #236 shown), or other worsted weight, feltable, self-striping yarn, two balls
Cascade 220 (CC), 100gr/ 220yds, (color #2410 shown), or other worsted weight, solid-colored, feltable yarn, one ball
24” circular needle, U.S. size 10/6 mm
Crochet hook, size J/6 mm
4 stitch markers (3 the same, one different), tapestry needle, magnetic bag closure

SIZES (approximate)


Alternate color way
Pre-felting      
bag: 12” across by 3¼” deep by 10½” high
strap:  2” wide by 24” long
closure w/ I-cord: 2 ¾” wide by 6½” long 

Post-felting
bag:  11” across by 3” deep by 8” high
strap:  1½” wide by 18” long
closure w/ I-cord:  2¼” wide by  5½” long
               
GAUGE
Approximately 16 sts and x 24 rows over 10 cm/4 in

DIRECTIONS
Bag Bottom
With CC, cast on 50 sts.  Work in garter stitch (knit every row) for 16 ridges or 32 rows.  Pick up sts around garter bottom:  Change to MC.  Knit one row, placing a marker before last stitch.  Continuing on to adjacent short side, pick up and knit 15 sts.  Place marker and then turn and pick up and knit 50 sts along long side, placing a marker before picking up last st.   Pick up and knit 15 sts along remaining short side – 130 sts total.  Place the different marker at end of row to indicate the beginning of the round. 

Bag Body
With MC, join to work in the round and begin pattern stitch:

Rounds 1 – 5: With MC, * p1, k4, p1, k5; rep from * to 5 sts before next marker ending with p1, k4. Repeat 3 more times, one for each side of bag.  (The short sides will only have one repeat of pattern.)
Round 6: As in Rows 1 – 5, only using CC. 

Repeat Rounds 1 – 6 until 9 full repeats have been worked, and then work one more repeat ending with Row 5.  Change to CC and knit one row, keeping only the 1 st after markers in purl.  Continuing to keep the 1 st after the markers in purl, purl one row and then knit one row.   Bind off all sts in purl.  Weave in ends.


Applied Crochet Chain (see sidebar for link to a photo tutorial of this technique)
Note:  the applied crochet chain stitch is worked into all the columns of purl sts, except for the four corners of the bag.  With CC, make a slipknot, leaving about a 5” tail.  Work crochet chain stitch as follows: with RS facing, insert crochet hook through the fabric of the bag into the center of a purl column just above bag bottom.  With other hand and working yarn inside bag, place the slip knot on hook and pull through to RS.  *Advance hook over next purl bump in vertical column and insert through bag.  Wrap yarn around hook and pull through to RS.  Pull new loop through old loop on hook.  Repeat from * until top of bag is reached.  Then break yarn and pull through remaining loop.
Note:  As you work, the yarn ends from previously completed crochet chains may tangle in your working yarn.  If this happens, you should stop and weave in all ends before continuing.

Bag Handles (make 2)
With CC, cast on 11 sts.  *K8, bring yarn forward between the two needles, slip the last 3 sts; repeat from * until piece measures 24”.  Bind off. 

Bag Flap with I-cord Edging (make 1)
With MC, cast on 8 sts.  Knit every row until piece measures 6”.  With CC, cast on 3 sts.  *K2, ssk, slip 3 sts back to left hand needle; repeat from * to last st.  Work corner: K3, slip 3 sts back to left needle, k2, ssk, slip 3 sts back to left needle, k3.  Turn piece and with MC pick up 1 st for every ridge along side.  Slip picked up sts back to left needle and continue with I-cord edging, including turning corner.  Turn and with MC pick up 8 sts along short end.  Slip picked up sts back to left needle and continue with I-cord edging, including turning corner.  Turn and pick up 1 st for every ridge along last side and then continue with I-cord edging.  When you reach cast on edge of I-cord, graft the last sts to the cast on sts.  Closure backing:  With CC, cast on 8 sts.  Work in st st for 2”.  Bind off.  Weave in all ends.

FELTING
Note:  all pieces (bag, handles, flap) are felted separately and then sew together after drying.
The felting process interlocks the wool fibers so that the fabric is thicker and less elastic.  Put the pieces in a lingerie bag or pillow case and close it (use safety pins on pillowcase).  Place the bag in the washing machine with a load of washable, lint-free, heavy-weight items to increase agitation.  Well-laundered jeans are ideal.   Try adding a pair of sneakers or tennis balls to the felting load to increase the agitation.   Since the plaid bag has color contrast, you may want to add a dye magnet sheet to prevent bleeding.  Set the machine for hottest water, cold rinse.  (The shock of the difference in water temperatures also promotes felting.)  Use a little bit of your normal detergent, but no bleach or fabric softener.  Check your bag frequently for signs of shrinkage, and then more frequently as it begins to felt.  Your bag is finished felting when it has reached the final dimensions, or you are happy with its size and appearance. 

Your bag’s shape may distort in the felting process.  Pull it back into shape and stuff with plastic bags or set it over a square object of the right size to set while drying.  Shape flap by folding in half.  Allow all pieces to dry completely.

FINISHING

Sew handles to inside of bag.  Attach one side of magnetic closure to backing piece and sew the piece to one end of reverse side of flap.  Sew the other end of flap to bag.  Position other half of closure on bag and attach.  

Wednesday, February 17, 2016

I'm A Sweater Girl, But This is a Wrap

21norofw15_small2
#2 Mitered Wrap
from Noro Knitting Magazine, Issue #7
I have not yet posted about my design for the Fall/Winter 2015 issue of Noro Magazine.  It is a bit of a departure for me because it is a shawl.  My first shawl design.

Most of my magazine and book design work has been sweaters.  And I enjoy knitting sweaters because they are a creative, technical and intellectual challenge.  Not only do you have to come up with an original design, but you also have to have the skill to execute your vision, and the mathematical ability to write a pattern for it in multiple sizes, only one of which you have made.  Sometimes one of these steps breaks down, and this was the origin of my mitered wrap.

#12 Cocoon Vest from Vogue Knitting, Fall 2015

The original design of the mitered shape appeared as the upper back/upper chest section of my Cocoon Vest from the Fall 2015 Issue of Vogue Knitting.  However, when I received the commission for the vest and got to the knitting, I found that I had not really thought it through, and that the mitering was not going to give me the effect I wanted.  So, I simplified the design, which actually created a more elegant piece.

Meanwhile, the VK editors were choosing designs for the next issue of Noro, and, while abandoned for the vest, the mitered shape had made an impression.  Matching the quadrangle shape with the self-striping Noro Silk Garden Sock and Sock Solo yarns was inspired, and I was happy to work with them on the piece.

So will the success of my first shawl design lead to more?  Who knows, but I was inspired by my class with Ravelry star shawl designer Melanie Berg at the January Thaw retreat.

Back to the garment knitting.  I've got a sweater due in a few weeks.

Wednesday, February 10, 2016

More Stitch Marker Love

In progress Woodfords by Elizabeth Doherty
It's Valentine's Day week and that must be the reason I keep thinking of more ways I love my stitch markers.  Two more to add to the list:  matching and marking changes.

When working a sweater bottom up, I will always work my sleeves (or the two fronts of a cardigan) simultaneously.  This ensures that my increases or decreases will be the same on both sleeves.  It also sidesteps the dreaded second-sleeve-syndrome.  But, this plan flies out the window when working top down or modularly (my new favorite construction method).  I suppose that you could pick up all your stitches around both armholes and work them simultaneously using magic loop, but to me that just seems like a one way trip to crazy town.

Stitch markers to the rescue.  When working my first sleeve, I put a stitch marker at every decrease.  When I get to the second sleeve decreases, I remove the stitch marker from the completed sleeve and move it over to the working sleeve.  Perfect match.

On the striped sleeve you might notice that my line of markers indicating decreases changes color halfway down.  In this instance it is not because I ran out of the green stitch markers.  (Although that might frequently be the explanation.)  I realized that I was not decreasing fast enough, and so changed the rate from every eight rows to every six.  The salmon pink markers denote the faster increases.

How do you love your stitch markers?

Wednesday, February 3, 2016

Meet My Best Buddies, Stitch Markers

I am here today to speak of my affection for stitch markers.  This urge came upon me at the Sun Valley Fibers retreat this weekend when Amy of the Stockinette Zombies asked me why I had over a dozen stitch markers in a column down the edge of my knitting.  Not only was she correct to ask for the reason behind this goofy behavior, but I also realized that I was using four colors of stitch markers for four different applications.  And, only one of them was called for in the pattern.

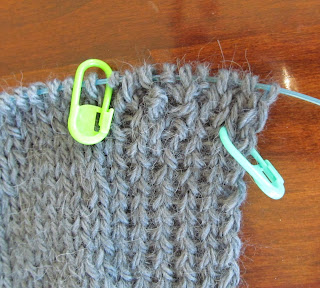
First, I thought I'd share with you my favorite type of stitch marker.  Yep.  The cheapo plastic locking stitch markers.  Many knitters enjoy assembling a collection of gorgeous stitch markers.  Some are so beautiful that the knitters actually wear them as jewelry.  But not many of these beauties meet my criteria for versatile stitch markers:  colorful and locking.  Color coding my stitch markers by their function makes them easier to use and prompt an all-too-busy brain.

The hot pink stitch marker in the photo above is the only one actually called for in the pattern.  (And the pattern is my Ardyth by Coco Knits.  Its function is to denote the break between the front and the back, since it is knitted all in one piece.  The orange markers are my own addition and mark each increase.  They are not written into the pattern, because the directions call for you to increase until you reach a certain stitch count.  But, for me, the markers are a clear visual and tactile reminder that I need to increase.  And this is important when one might be distracted by table chatter at a retreat or guild meeting, or a particularly dramatic moment of Downton Abbey.  It's also faster to count markers to know how many times you have increased than it is to count the stitches on the needle.

This photo demonstrates the purpose of the other two colors of stitch markers on my work.  The lime green marker is indicating the break between the stockinette fabric and the ribbed edging.  Without it I would purl all the way to the edge on virtually every wrong side row.  The last marker in play, the blue one hanging off the edge, is marking my buttonhole.  Again, it is a visual reminder that I need to be making holes in my knitting every few inches.

Other uses for my little buddies:

- Cast on counting.  When casting on a lot of stitches, I will add a stitch marker to my needle every fifty stitches.  Then I don't have to re-count from the beginning when I want to check that I have enough stitches.  And it is so easy to lose track when your count is up into the hundreds.

- Marking the right side of your knitting.  This is a useful tip for beginners or reversible projects.  After casting on, I will place a stitch marker on the lower right corner of my right side.  Then a quick glance tells me if I am working the right or wrong side of my knitting.  When working a long piece, such as a scarf, I will move the marker up as I go so it is always in my visual field.

- Marking the location of a centered decrease.  When working a column of double decrease, such as k3tog or p3tog or their many variations, if your marker is on the needle immediately before the decrease stitch of the last row, it has to be taken off the needle and replaced with every decrease.  If, instead, you place it on the stitch, and move it up every few rows, you can follow the column with your eyes to know where to center the decrease (or increase).

So, basically what this comes to is the recognition that my brain needs prompting, and that I would rather take the time to add extra stitch markers to my needles or my work than to have to rip back when I have forgotten to work an increase/decrease, change pattern, make a buttonhole, etc.  It's a trade off, but these days I'd rather have well known podcasters ask me the reasons for my goofy behavior than have to tear out minutes or hours of knitting.